Showing posts with label tutorial. Show all posts

DIY Very Hungry Caterpillar Felt Book + Free Printable


I promised you a printable from Emmett's party, so here it is! If you're looking to make your own Very Hungry Caterpillar felt book, this printable is for you. I think this would make a perfect gift for a young child or a teacher. You could even enlarge all the pieces and use it in the classroom with a felt board. You can use any felt, but I like to use wool felt blends because the quality of the felt is higher and it comes in a wide variety of beautiful colors. I purchased mine here (if you sign up for their newsletter, you can get a discount code too). 

Materials:
different colored felt
Very Hungry Caterpillar printout
scissors
pins
glue

Go ahead and cut out each object, leaving a generous amount of space around the outline. Next, pin it to the appropriate colored felt. 


After that, simply cut out the felt pieces along the lines and then remove the pins and discard the paper. At this point, several of the pieces will already be done! A few of the more complicated pieces may need to be glued together, either with white glue, fabric glue, or a few dots of hot glue. 

For the actual felt book, I bought some grey felt by the yard at the fabric store, and then cut them down to size. I sewed them down the middle to hold the pieces together, and that was it! 

Here's a look at each of the pages:
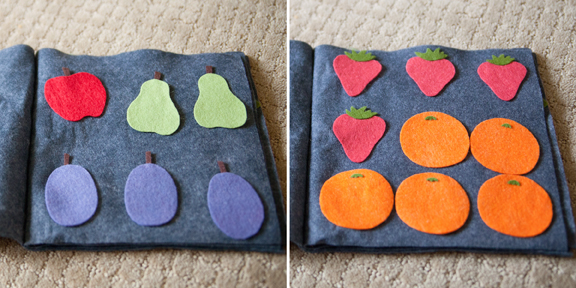
1 apple, 2 pears, 3 plums, 4 strawberries, and 5 oranges

cupcake, ice cream cone, pie, watermelon, lollipop, cake, cheese, salami, pickle, sausage

1 green leaf, the cocoon, and the final butterfly


Read more...

DIY Giant Cardboard Letters


Grenada's Save the Children Foundation (Grensave) holds an International Food and Drink Festival every year with booths from different countries around the world. I volunteered to help out with the decorations for the America table, so my awesome decorations team and I whipped up these red, white, and blue pinwheels, flags, firecrackers, and giant letters. A lot of people asked me how I made the letters, so I wanted to share this tutorial with you. 

You should be able to make them with supplies that you already have in your house (and that you can find even on a tropical island): 


Materials:
cereal box
cutting mat
Xacto knife
ruler
printed block letters
hot glue gun


Step 1: Cut generously around your printed block letter and staple to the cereal box (cereal box brown side up, printed letter right side up. The orientation didn't matter for my letter "U," but it would with letters that aren't symmetrical. 


Step 2: Cut out the letter and cereal box with an Xacto knife or with scissors. 


Step 3: Flip the letter over and trace it again (cereal front sides facing each other) and cut out. 


Step 4: After you've finished cutting out your letter shapes, cut out a couple stripes of cardboard roughly the same width of your letters.You'll need a different amount depending on the letter. 


Step 5: Begin glueing the strips to your letterform. I purposely lined up the folded part of my cardboard strip with the corner of my "U" so that the crease would fall in the right place. You'll want the strips of cardboard to sit on top of the letterform so that from the front and back, you'll see no glue or edges. 


I used two strips for the outside of the "U" here. I joined them at the bottom with some glue on the inside. 


Step 6: Repeat the same steps for all sides of the letter. 


Step 7: After all the sides have been glued, go ahead and place the top on. This part is a bit trickier to glue. I flipped my letter over so that the extra face that still needed to be glued on was lying on the table. I then put hot glue on small sections at a time and then lined up my sides to the bottom. 


Here's a close-up to show you how the letter is constructed and a little cross-section diagram here for you:


Step 8: And when your letter is all done, it's time to paint! I used 2 coats of tempera paint for each of my letters. Make sure to let them dry before you put the second coat on. 


Let dry overnight before you use them! 


Read more...

DIY Placemats


I promise you this will be the easiest DIY project you'll ever do. It's literally just one step, but I think the results are quite pretty for the amount of work it takes. :) 


Supplies:
decorative paper punch
decorative paper (I used gold vellum)


The punch I used is this floral one from Martha Stewart. You can find it at Michaels or anywhere they carry Martha Stewart craft products. 


Step 1: Line up the punch with a corner of your paper. Move the paper around to see where it would make the prettiest punch. And then punch! Repeat for all four sides. 


And that's it! I told you it was easy. 


Read more...

DIY Penant Flag


I've made many penant flags/garlands/bunting before, and I love how you can always customize it to fit your needs. For this particular one, I used a variety of different colors and patterns to complement the main coral color of the bridal shower. 


Step 1: First, you'll need to determine how large each penant will be. I was trying to maximize the number of penants I could get out of an 8.5x11 sheet, so I played around a bit and I think I got 4 or 5 onto  a page. 


Step 2: Next, you'll need to find a way to attach your penant to your ribbon. There are several different ways to do this. In the past, I've used a ribbon punch to punch out holes and then I strung the ribbon through. I've also folded the edge of the penant over the ribbon before and used a piece of double-sided tape to keep it in place. This time, I decided it'd be easiest to use a glue runner to keep the penants in place. The width of the adhesive was exactly the same width as my ribbon, so that was super convenient. So I just rolled the glue runner over the ribbon lightly.


Step 3: Next, I carefully placed each penant right side down onto the ribbon. Remember to press firmly to attach. 


I left just a small space on the top so the paper wouldn't peek through the top. Here's a close-up
.

And here's the front of the penant flag. To store it, simply roll around a round object and tape in place. I happened to have this giant spool of ribbon on hand, so I just wrapped it around that.


Read more...
Related Posts Plugin for WordPress, Blogger...

© Rebecca Thongkham 2010


  © Blogger template Shush by Ourblogtemplates.com 2009

Back to TOP