DIY Blue Ombre Layer Cake

A few pictures from the day when I baked Dean's cake.
P.S. I used cake mix + blue food dye. :)


Read more...


Let me introduce you to Elmer. We met in typography class last week. He loves peanuts and cheddar cheese (though he's been rather reluctant to indulge in the latter recently; he's watching his weight). He also has an affinity for beautiful fonts and smart design.
Elmer was part of an in-class exercise to create an animal using only type. The exercise helped us recognize and appreciate letters as shapes, lines, and beautiful forms.
 Well, there's actually only one more month of summer left, but I wanted to share with you a little project I did for our summer camp this year. To help generate excitement for camp and to help with marketing a bit, we came up with the idea of having buttons/pins that corresponded with each week's theme. Some of the themes we had included Pirate Week Crafty Creations, Camping Week, Gamerz, Entrepreneur Week, and Hollywood Glam, to name a few. The children were encouraged to come each week, receive their collectible button, and redeem them at the very end for exciting prizes!
For the icons, I used a lot of the pre-made ones available in Illustrator and also created a few of my own to add to the mix. I assigned each icon an appropriate color to help further distinguish each week from the next.
We ended up getting this button machine and starter kit from Badge-A-Minit because they had the most affordable option for our purposes. It's definitely not as nice as an automatic one, but for the quantities that we needed, it worked just fine! It takes a little practice to get it just right though.
 Here's a wall display I created to let all the children and parents know about our weekly themes.


 One of our themes during Spring Camp for the kids was "Entrepreneur Day" where we asked them to brainstorm business ideas, and then to come up with a plan and strategy to execute their business ideas. The group I worked with decided to open up a Rootbeer float shop that they named Floating Cream.
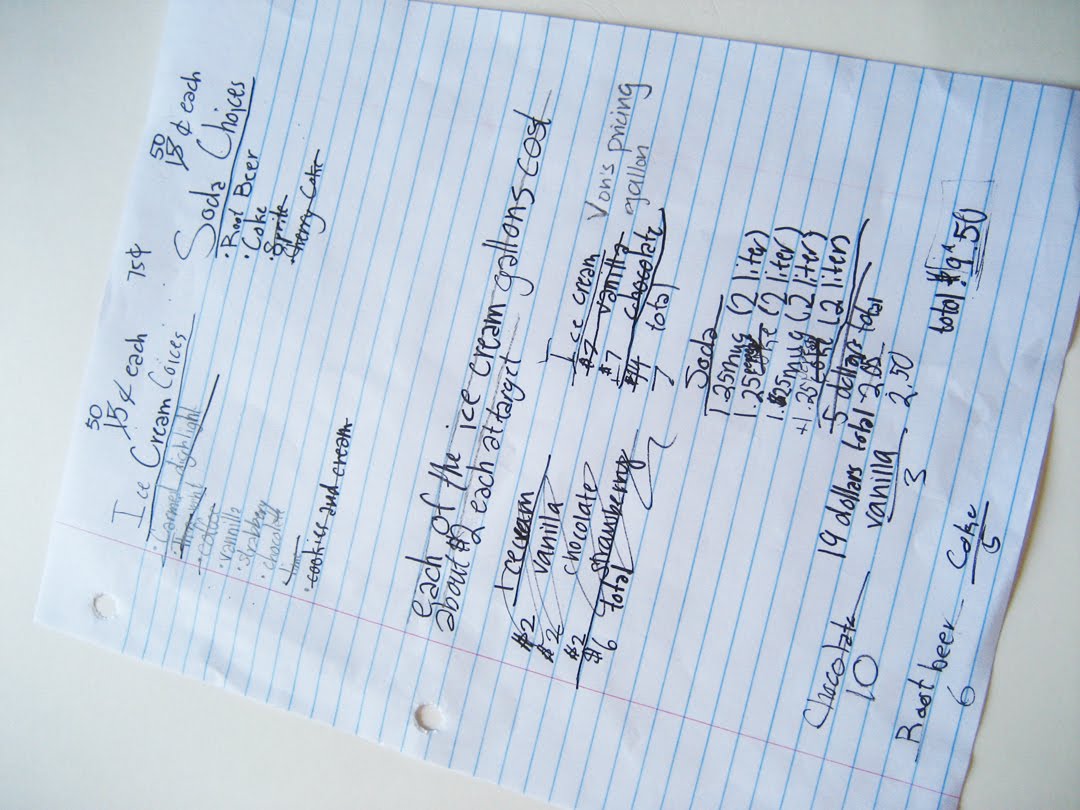 They did all the research as to how much ice cream and Rootbeer cost, estimated how much they would need, how much to price the floats, and even conducted a customer survey with their peers to see which flavors of ice cream and soda they liked best.
 After that, they designed their logo and marketing materials, including custom cup wrappers, brochures, flyers, and a poster for the shop table.


 The shop was such a smashing success, we've since re-opened it every Friday! I'm so proud of the work they did, from their thoughtful design process to their business-savvy in conducting marketing research and advertising to their excellent customer service!
Recently, I've been working with clay a lot with my kids at school. We've been creating cute, miniature animals and pea-sized hamburgers and ice cream cones. I've discovered that anything is cute when it's 1/10th its original size! I've fallen so in love with the medium that when my husband's birthday rolled around, I decided I wanted to bake and decorate him a cake using fondant (okay, clay/fondant, not exactly the same thing, but you get where my inspiration was from).
I tossed around a few different ideas (Phx. Suns? a basketball court? an Xbox?) and finally settled on a Super Mario Brothers-inspired cake! I might have been swayed by the bright, fun colors that the Super Mario Bros. theme offered...
Anyway, after a full weekend (read: 15+ hrs.) of baking/mixing/kneading/drawing/cutting, I want to share with you the final product! It's not perfect, but overall I'm pleased with the result, given this is my first time working with fondant...or making a three-layered cake (German chocolate, lemon, and red velvet!)
Happy Birthday, Deanie! Hope you liked your cake. :)


Thanks, Bri/Steph for the fondant recipe!
 When my sister had her Chuck party last week, I whipped up these printable boxes for her to hold Chuck's favorite snack - cheese balls! I couldn't resist making matching food flags in the style of the episode names and Orange Orange yogurt labels too. :) I wasn't able to be there for the party, but doesn't it look like a great time?


 If you're interested in holding your own Chuck party, I've made the cheese ball box and Chuck labels available for you to download here. Enjoy!
Aside from being great for holding cheese balls, these also make perfect popcorn boxes. Or pretzel boxes. Or my personal favorite - Xtra Cheddar Flavor Blasted Goldfish boxes! For all those non-Chuck-related events, I've made an additional blank popcorn box template for you, along with a tutorial as well! Keep reading for the full tutorial and pics...
***
DIY Popcorn Box Tutorial

 Materials: paper, scissors, double-sided tape, bone folder, popcorn box template
 Step 1: Print out the DIY popcorn box template onto the wrong side of the paper (my paper was the same color both sides).
 Step 2: Cut out the template along the solid lines.
 Step 3: Score along the dotted fold lines (I'm using a Martha Stewart bone folding kit that comes with a grooved surface. The grooves help me line up my paper and allow me to make straight creases without a ruler. If you don't have the kit, you can just use a ruler with your bone folder.)
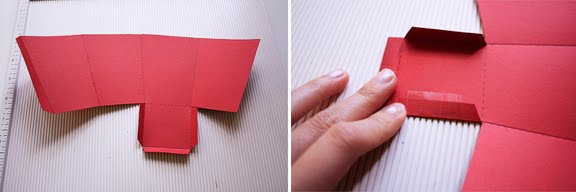 Step 4: Fold along the creased lines and tape together.
 Step 5: Fill with your favorite snack and enjoy while watching your favorite TV show!
Note: If you'd like, you can also trim along the top edge of the box with scalloped or decorative scissors like my sister did with her cheese ball boxes!


 Posts
All Comments
Posts
All Comments

© Blogger template Shush by Ourblogtemplates.com 2009
Back to TOP


