
DIY Fabric Bird Tutorial + Free Printable
A while back, I made some stuffed lovebirds for some friends of mine. I searched high and low on the internet for a free template / tutorial, but wasn't able to find one that looked just right to me. I had this picture in my mind of how I wanted my birdie to look, and all the bird tutorials I found were either too skinny, too long, too fat, or too shapeless.
After much trial and error (and several stuffed birds later), I finally managed to create a pattern that was to my liking. In case you're ever looking for a stuffed bird pattern, I thought I'd share it with you! Here's a quick tutorial on how to put it together as well:
Step 1: Download the free fabric bird template here.
 Step 2: Cut out bird pieces from fabric or felt. I used three different colors here, but you can also use the same colors for the belly and wings.
 Step 3: Using a blanket or buttonhole stitch (learn how here), hand-stitch the two wings to the two body pieces. Make sure your body pieces are facing opposite directions when you stitch the wings on, or else one wing will be on the inside of the body!

 Step 4: With the correct sides of the body parts facing each other (wings on the inside), sew using a straight stitch from the tip of the beak to the top of the tail.
 Step 5: Now, take your belly piece and with the correct (top) side facing in, align the edge of one side of the belly with the corresponding edge of the body piece.
 Step 6: Sew these pieces together, shifting the bird body piece to match the belly piece. The belly piece should line up with the entire underside of the bird body piece. Sew to the end, but do not finish off the tail.
 After sewing one side of the belly piece to one of the body pieces, your bird should look like this:
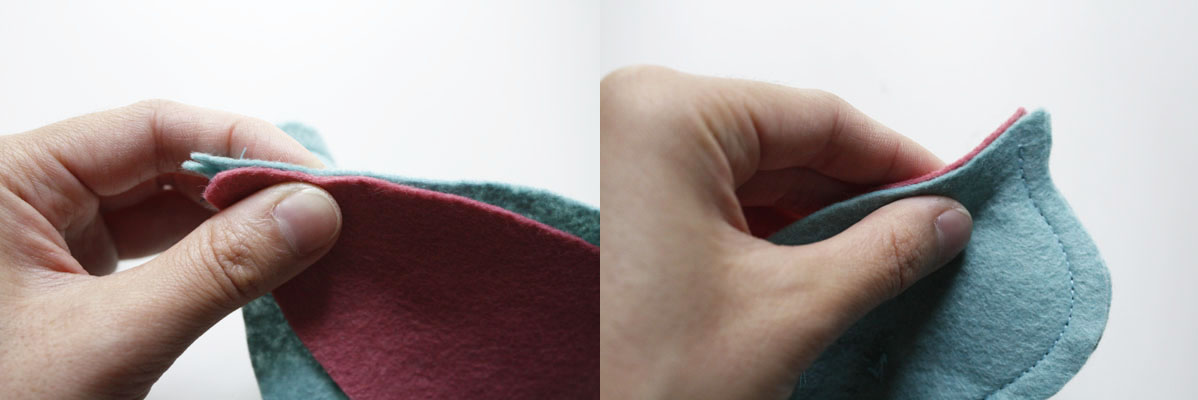
 Align the other side of the belly with the second body piece and repeat the same step above. Your bird should now look like this:
 Step 7: Flip the bird inside out by pushing in the bird's beak and forcing it out through the small opening at the end of the tail. You might want to use a chopstick to help push it through.
Step 8: Stuff the bird! If the bird will be a gift for a baby or a child, you can even put a bell inside at this point.

Step 9: Lastly, sew up the tail using a hidden stitch. And that's it!
 Some other birdie friends in different fabrics and colors:


you mean, several stuffed whales later... :)
O_O TO CUTE!!!! I love the black patterned one!
Oh... whales would be cute too. :-P And if you put a little baggie of sand in it, maybe it can be a paper weight too?? A fabric paper weight would be delightful!
Oh btw, sorry didn't respond to the other post, but I just decided to pick up a boring, not cute gps case. :-P Thanks though!
Julie: haha, right.... :)
Nancy: thanks!!
Alvina: the sand's a great idea! beans or rice could work too. :)
no worries about the bag - glad you found something that worked!
Cute!I like the blue patterned one! Who'd you make them for?
Grace: I made them for Esther and Ben :)
wow I am so appreciative of your pattern! Thank you so much for sharing! CM2 :-)
You're welcome! I'm glad you like it.
Thanks, I used this template to make wedding-cake toppers for my little sister. They turned out perfect- just the shape I was after! Thanks!!! I'm just finishing them up now, but when I'm done (hopefully today) I'll take pics and post them on my blog, because it's always fun to see what people do with your pattern! www.kickyerheelsup.blogspot.com
thank you very much for the pattern. When I made them a will post some pics in my blog
Thanks so much for sharing your talent and cute pattern!! I used this pattern to make birdies for a "love bird" themed bridal shower and also to make a canvas wall hanging. I shared your link on my blog...thanks again!!
www.craftychicka.blogspot.com
Thanks for the great tutorial! I use it in my project and I linked back to you on my post.
http://krasart.com/?p=194
I made one of these and filled it with sand - makes a great door stop!!!
I just wanted to say THANK YOU for this brilliant tutorial. I am going to make mini versions for our cake toppers :)
Você está viva ainda? Ou já morreu
Você morreu?